So your lace front wig tore—and now you're panicking? Don't stress. A ripped lace doesn't mean your favorite wig is done for. With a few tools and some patience, you can totally bring it back to life. In fact, one of the best ways to fix a ripped lace front wig is by using a needle and lace patch. It's a simple DIY repair method that keeps your wig looking natural and saves you money from replacing it.
Why Lace Front Wigs Rip

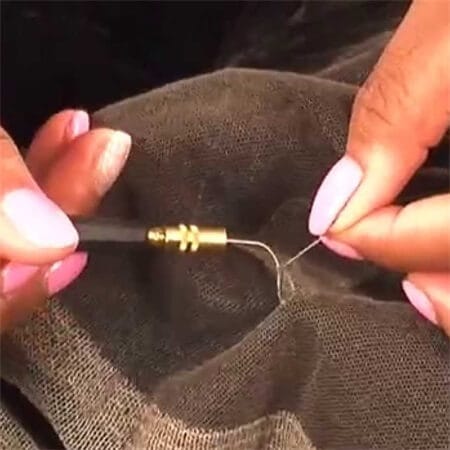
Model: @kaviarkez_ | Wig by UNice
Lace front wigs are made from delicate lace that's designed to blend seamlessly with your scalp. But that same thin lace can easily tear from daily wear, over-plucking, or rough handling. Common reasons your lace might rip include:
- Pulling the lace too hard while putting on or removing your wig.
- Using too much adhesive or harsh glue removers.
- Over-plucking the hairline to customize the wig.
- Frequent washing or styling without gentle care.
The good news? You don't have to toss your wig. You just need a needle, thread, and a small lace patch to restore it.
What You'll Need
- A fine sewing needle
- Thread that matches your lace color (usually beige or light brown)
- A small lace patch (cut from an old lace wig or lace fabric)
- Scissors
- Tweezers (optional for detailed work)
- Wig head or mannequin stand
Step-by-Step: How to Fix a Ripped Lace Front Wig Using a Needle and Lace Patch
View this post on Instagram
Step 1: Clean and Prep the Area
Gently clean the ripped section with a mild shampoo or alcohol wipe to remove any residue or glue. Make sure it's completely dry before you start sewing. Place your wig on a wig head to keep it steady while you work.
Step 2: Cut and Position the Lace Patch
Cut a small piece of lace from your patch fabric—just big enough to cover the rip with about half an inch of overlap. Place it underneath the torn area so it reinforces the original lace without showing through.
Step 3: Thread the Needle
Use a thin needle and a thread that matches your lace color. Double-knot the end of your thread to secure it, so it won't slip while sewing.
Step 4: Sew the Lace Patch
Start sewing around the tear using tiny, tight stitches. You want to catch both the original lace and the new patch for a secure hold. Go slow—precision is key! Sew in a looping motion to keep the repair flat and invisible.
If the lace is torn along the hairline, make sure to stitch carefully between the hair knots to avoid pulling out any strands.
Step 5: Secure and Trim
Once you've sewn the tear completely, tie off the thread and cut the excess. Trim any extra lace from the patch underneath so it blends naturally with the rest of the wig cap. Use tweezers to gently pull a few hairs over the repaired area—it'll hide the stitching perfectly.
Pro Tips for a Seamless Repair
- Work under bright light so you can see every tiny stitch.
- If the lace tear is too close to the hairline, try using transparent thread for an invisible finish.
- Apply a thin layer of wig glue or fabric adhesive under the patch if you need extra reinforcement.
- Once repaired, let your wig rest overnight before wearing it again to allow the stitches to set.
When to Replace Instead of Repair
If your lace front wig has multiple large tears or the lace around the front is thinning out, it might be time for a new one. Instead of constantly repairing, consider investing in a high-quality lace front wig like the UNice Glueless Lace Wig. It's made with durable HD lace that's softer, stronger, and designed for long-term wear—no glue, no stress, no rips.
Final Thoughts
Fixing a ripped lace front wig with a needle and lace patch might sound tricky, but once you get the hang of it, it's surprisingly easy. It's a small effort that can make your wig look brand new again—and save you from spending extra cash. Take your time, follow the steps, and your lace front will be ready to slay again in no time.