How to Melt Your Lace on a Wig Like a Pro?
Have you ever faced a question about how to get the lace to blend in perfectly with your hairline so that it’s invisible, especially when you are learning how to install a lace front wig? If you have, then rush to read the following content. In this blog, we will teach you how to melt your lace on a wig like a pro.
Things You Will Need for a Perfect Melted Lace Wig:
- A Rat Tail Comb;
- A Pair Of Eyebrow Razor;
- Eyebrow Brush;
- Alcohol;
- Cotton Pegs;
- A Blow Dryer;
- Got 2B Glue;
- Got 2 B freeze spray;
- A Nude Wig Cap;
- Powder Or Foundation;
- A Wrap Strip;
- Wet Towel;
- Hot Comb;
- Lace Wig (HD Lace Wig is Better)
How Do You Melt the Lace on a Wig Like a Pro?
Step 1: Lay Flat Your Natural Hair
First of all, you should pull your freshly shampooed natural hair down into a bun or braid it up and then take some gel to lay your own edges down so that they won’t be in the way. If possible, use some cotton pegs that are wiped with some rubbing alcohol to clean the area around the hairline, thus removing the excess oil and dirt.
Notice: If you have a lot of natural hair that needs to go under the wig cap, try to braid it into cornrows to make it as close to your scalp as possible.
Step 2: Put on a Wig Cap

Source: unice wig cap
Next, you can put on a nude wig cap or a wig cap that closely matches your skin color to make it a little forward past your hairline and cut holes in the ears so that the wig cap can lay flat on the sides of your head. Only in this way, you can ensure the wig looks as natural as possible.
Step 3: Use a Freeze Spray to Hold the Wig Cap
Continue to apply some Got 2B freeze spray along your hairline and use a blow dryer to dry the wig cap completely. Once the wig cap is holding down and completely dried, rush to cut the excess part of the wig cap along your hairline.
Step 4: Blend the Wig Cap with Your Skin
Pat some foundation that can blend with your skin around the middle part of the wig cap and your hairline. Then use a cotton ball that is wiped with alcohol to clean up your hairline by removing any excess foundation.
Step 5: Put on the Wig
Source: Pinterest
Put on your wig, pull the lace down over your forehead to get the hairline in place, and check its position from all angles to make sure it looks natural.
UNice lace front wigs also come with adjustable straps and combs on the inside. You can adjust these to make sure the wig is neither too tight nor too loose.
Step 6: Spray a Freeze Spray to Hold The Wig
While the lace wig is held in place, lift the lace front and apply a freeze spray under the lace along the hairline to hold the wig. It would be better to try to spray the freeze spray as close to your scalp as possible so it doesn’t get all over your forehead.
Step 7: Blow-dry Your Hairline to Secure the Wig
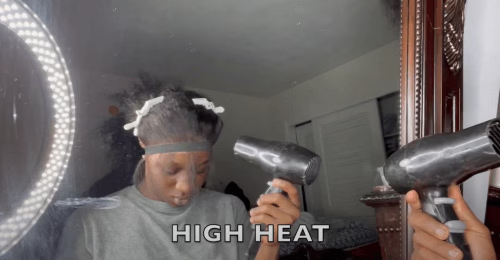
Source: @baybeeghairviews9967
Use a blow dryer to blow dry your hairline and move it slowly back and forth over your wig’s hairline. to secure the wig to the spray. Then press the lace down onto the freeze spray as you dry it so they adhere together. Don’t forget to use low heat to avoid burning your scalp.
Step 8: Put a Wrapping Strip around Your Hairline
Put a wrapping strip on around your hairline, line it up, and then tie it off at the nape of your neck to ensure the center of the wrap covers your hairline around your scalp for at least 10 minutes, which is used to protect your hair and hold your wig in place while the lace is melting into your hairline.
Step 9: Take off the Wrapping Strip
Remove the wrapping strip to reveal the hairline and lace. Check whether the lace wig's hairline is starting to stick to your scalp or not by gently pulling the lace upward.
Once it doesn’t stick to your scalp, repeat applying more freeze spray and the above steps right away.
Step 10: Trim Away the Excess Lace
Use an eyebrow razor to cut away the excess lace as close to your hairline as possible until all is cut.
If you are not certain how to cut the lace properly, you can read our beginner guide on cutting lace on wig.
Step 11: Apply Gel along the Edges of the Lace
Put a very small amount of hair gel on the end of a rat tail comb and press the gel down along the edges of the lace to make the remaining small bits of lace pressed flat against your scalp.
Step 12: Dry the Gel with a Hairdryer
Dry the gel with a blow dryer and run it back and forth over your hairline to melt the rest of the lace.
Remember to test the tackiness of the gel with your finger. If it is still wet or sticky, keep drying it until your finger comes away dry to the touch.
Then use a corner of a clean and wet towel to gently rub away any visible dried gel in front of your hairline. Or you could apply a wrapping strip for 15-20 more minutes instead of using the blow dryer.
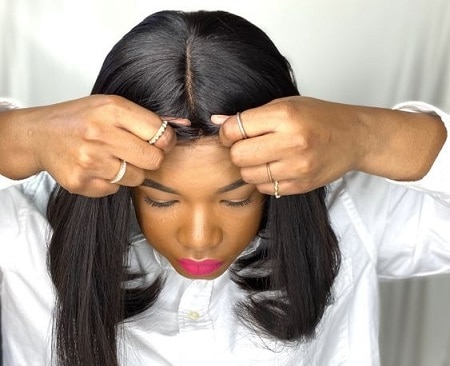
Step 13: Create Baby Hairs to Mimic a Natural Hairline
Source: @baybeeghairviews9967
Use a rat tail comb to pull out a few hairs from the wig all along your hairline. Take your eyebrows razor and shave the hairs and then use gel and an eyebrow brush to mold them into curls along your forehead.
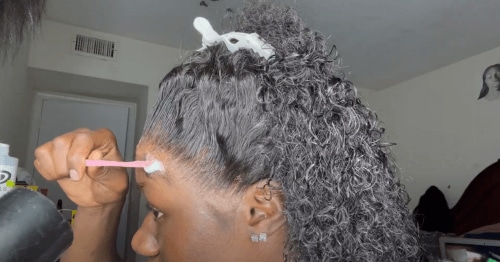
Step 14: Match the Lace Color with Your Skin Tone
Apply a little bit of powder or a small amount of foundation along your hairline to make the lace blend in with your skin tone. If the color of the lace perfectly matches your skin tone, it may not be necessary. So it is clever to buy an undetectable HD lace wig to help melt the lace with your skin tone.
Step 15: Use a Hot Comb to Lay Down Your Wig
Use a hot comb to lay down your wig for a flat, sleek style when your wig doesn’t lay as close to your scalp as you like. In the process, you must keep moving the hot comb to push your hair down toward your scalp rather than holding it down in one place.