Mastering Wig Plucking: A Detailed Step-by-Step Guide
When it comes to wearing wigs, plucking is a staple in creating a natural-looking hairline. Wigs of a higher density are more likely to be unplucked. Unplucked wigs have not had the hairline plucked and will have a more uniform, unnatural-looking hairline straight out of the package. Pre-plucked wigs, on the other hand, already have their hairline meticulously plucked, providing a more natural appearance right out of the box. "Pluck a few hairs from the center part and hairline of synthetic wigs for a more natural look." According to WikiHow.
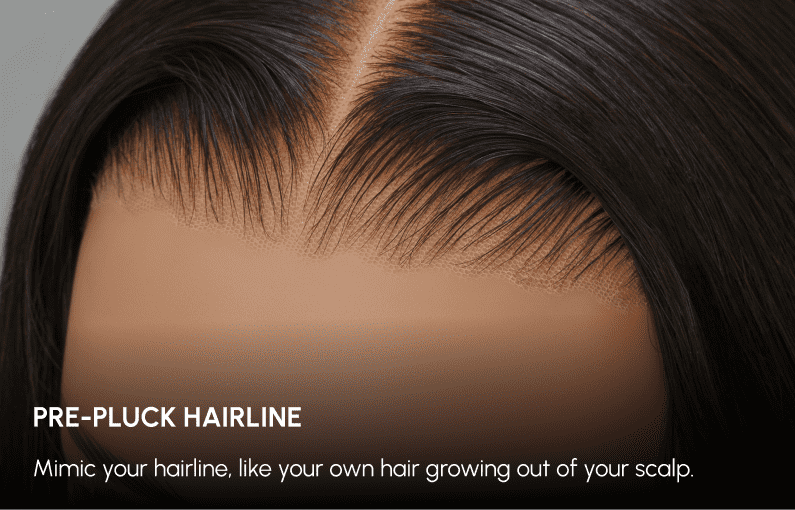
Source: unice.com
If you’ve never plucked a wig before, don’t worry, we'll break down all the intricacies of wig plucking, from where to start to exploring techniques. Whether you're a beginner or a seasoned stylist, you’ll be able to understand how to pluck your wig.
Step 1: Preparation
Before you begin plucking your wig, it's essential to prepare the necessary tools and materials. These include:
◆ A fine-tipped tweezer
◆ A wide-tooth comb
◆ A magnifying mirror (optional but recommended for precision)
◆ A wig stand or mannequin head to hold the wig in place
Step 2: Bleaching Knots (Optional)
You may want to consider bleaching the knots of your wig for a more natural scalp-like appearance. This step is entirely optional, but refer to this guide on how to bleach knots. To save time, consider choosing a wig that already has pre-bleached knots, such as UNice Bye-bye Knots Wig.
Step 3: Washing and Detangling
Start by washing your wig to remove any product buildup or debris. Use a gentle sulfate-free shampoo and lukewarm water, taking care to avoid tangling the hair. After washing, gently comb through the wig with a wide-tooth comb to detangle any knots or snarls. Allow the wig to air dry completely before proceeding to the next step.
Step 4: Marking the Hairline and Parting
Using a washable marker or eyeliner pencil, carefully mark the desired hairline and parting on the wig. Take your time to ensure accuracy, as these markings will serve as your guide during the plucking process. Consider referencing a photo of your natural hairline for guidance on shaping and placement.
Step 5: Sectioning the Hair
Once the hairline and parting are marked, divide the wig into small, manageable sections using hair clips or pins. This will help you maintain control and precision as you pluck each area, ensuring uniformity and balance throughout the wig.
Step 6: Plucking the Hairline
Begin plucking the hairline by gently grasping individual hairs with the tweezers and pulling them out in the direction of hair growth. Start with small, subtle movements, gradually thinning out the hairline to create a natural-looking transition. Take care not to over-pluck or remove too much hair, as this can result in an unnatural appearance.
Keep in mind that your wig plucking process should not only focus on the initial section of the hairline near the forehead. The objective is to reduce density and eliminate the "wiggy" appearance. To achieve this, you'll need to pluck hair across various layers, adopting a technique of plucking every other hair or so. Once you've completed the plucking from ear to ear in the first section, move on to the next section by flipping it forward. Repeat this process until you achieve your desired look, typically around four rows, although this can vary based on your preferences. Finally, comb through the hairs to complete the process.
Step 7: Creating Baby Hairs (Optional)
For added realism, consider plucking a few hairs along the hairline to create baby hairs. These fine, wispy hairs can help soften the look of the wig and mimic the appearance of natural baby hairs. Use the tweezers to pluck hairs selectively, focusing on areas where baby hairs would naturally occur.
Step 8: Checking for Symmetry
Periodically step back and assess your progress, checking for symmetry and balance across the hairline and parting. Make any necessary adjustments as you go, ensuring that the wig looks natural and flattering from all angles.
Step 9: Final Touches
Once you're satisfied with the wig plucking process, give a final comb-through to smooth out any remaining tangles or flyaways. Style the wig as desired, using hot tools or styling products to achieve your desired look. Finally, try on the wig and make any last-minute tweaks for your perfect fit.
Creating a natural-looking hairline involves more than just plucking away excess hair. Density and irregularity play key roles in mimicking the nuances of natural hair growth. Mastering the art of wig plucking takes practice and patience, but the results are well worth the effort. By following these step-by-step instructions you can achieve your perfectly customized fit. and incorporating tips from industry experts, you can achieve a natural-looking hairline and seamless blend with your own hair. Whether you're wearing a wig for fashion, convenience, or medical reasons, mastering the art of plucking can enhance your overall wig-wearing experience and boost your confidence in your appearance.
Read More
How to Do a Side Part with Lace Front Wig?
How to Cut a Wig Shorter? 3 Different Ways Provided
How to Detangle a Wig: Detailed Steps for Synthetic & Human Hair