Flip Over Quick Weave: Your Guide to Effortless Style and Versatility
The flip-over quick weave is a trendy hairstyling technique that many women use to add volume and versatility to their hair without stressing their natural strands. This method involves installing a weave in a unique way that creates a seamless, part-free look on top. I've personally found this technique to be a game-changer, especially when I want a style that gives me a full glam look without the stress of a lace frontal or sew-in.
In this guide, I'll walk you through everything you need to know about the flip-over quick weave and answer some common questions you might have before trying it out.
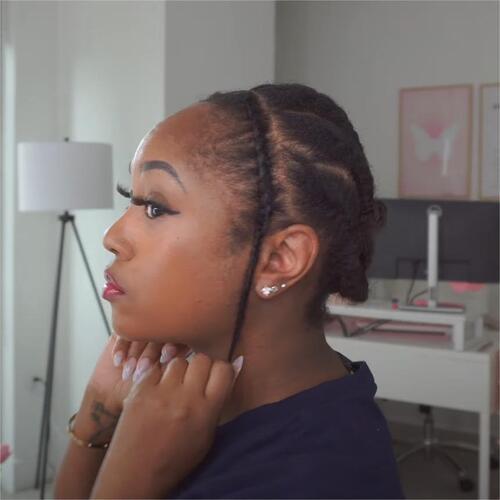
What Is a Flip-Over Quick Weave?

Source: UNice Customer Review
The flip over quick weave is a hair technique that allows you to rock voluminous, seamless styles without committing to a specific part. Unlike traditional sew-ins or wigs, it doesn't require creating defined middle or side parts. Instead, it gives you the freedom to move your hair in any direction while maintaining a natural and polished look.
Related post: Quick Weave Vs Sew In, Which One Is Better?
Here are the key aspects:
✨ No Side or Middle Part: The hair is completely covered under the weave, so there's no visible left-side, right-side, or middle part. This means you can flip your hair to either side without revealing any part line. (That's why it's sometimes called a no-part quick weave.)
✨ Front Section for Blending: A small section of hair at the front (often just a few inches) is left out of the cap. This leave-out is styled to blend seamlessly with the weave bundles. For example, if your bundles are straight, you might straighten this leave-out; if they are curly, you curl it. This way, the transition at the hairline looks natural.
How Flip-Over Quick Weaves Work
The flip-over quick weave is installed through a series of steps that prepare your hair, attach the weave, and then blend the leave-out. Video tutorials can be helpful, but here's the general process:
Step 1: Prepare Your Hair and Leave-Out
Source: DionaLatia
Start with clean, detangled hair. Divide your hair into two parts: leave out a small section at the front and set it aside. Braid or twist the remaining hair towards the back of your head, keeping the braids as flat as possible. This creates a smooth base under the cap.
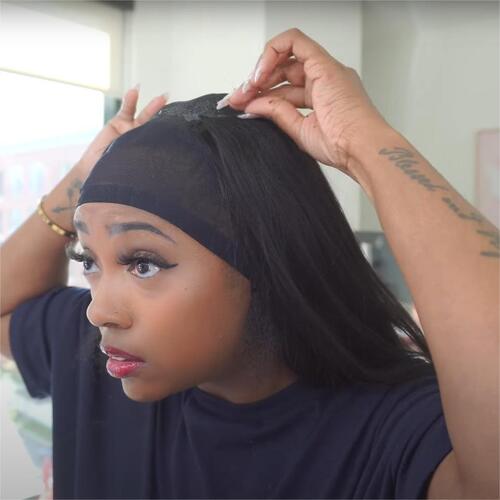
Step 2: Wear a Wig Cap
Source: DionaLatia
Place a thin nylon wig cap over your braided hair, covering the entire head. The cap should lie flat against your head. The cap will hold the glue and wefts and protect your natural hair underneath.
Step 3: Glue the Wefts
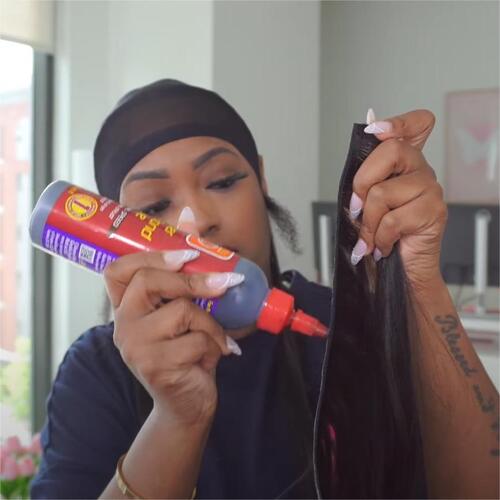
Source: DionaLatia
Starting at the nape of your neck, apply a thin layer of bonding glue or spray adhesive to the cap (or the weft tracks). Press the first weft onto the cap near the nape and hold it until it sets. The hair weft used in the video is UNice yaki straight hair.
Step 4: Continue moving upward
Source: DionaLatia
Apply glue to each track and lay it flat on the cap, filling in evenly. Make sure the tracks lie flat and full against the cap. When you reach the crown, continue placing tracks in a U-shape or circular pattern to fully cover the top.
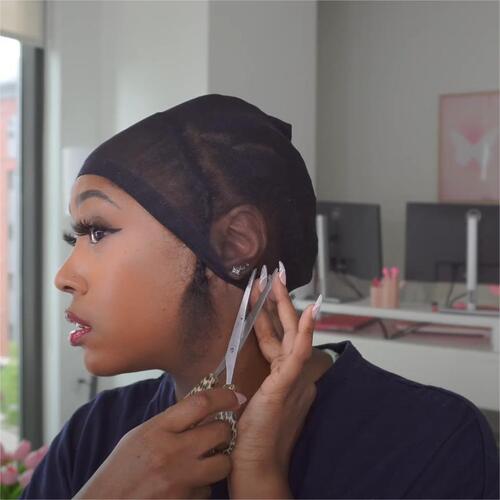
Step 5: Cut the Front of the Cap

Source: DionaLatia
Once the back and crown are fully covered, cut the wig cap above the leave-out. Using small scissors, carefully trim away the front part of the cap to expose your leave-out hair. Be careful not to cut your own hair!
Step 6: Loosen and Style the Leave-Out
Release your leave-out section. If your bundles are straight, straighten the leave-out; if they are curly or wavy, curl the leave-out in sections. This ensures the small front section of hair flows seamlessly with the weave.
Step 7: Style Baby Hairs (Edges)
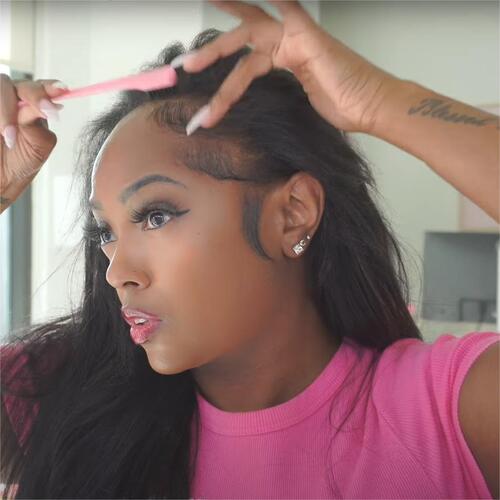
Source: DionaLatia
If you have baby hairs or short edges, you can style them now. Use a small edge brush and some edge control gel to lay down a swoop or smooth finish along your hairline. This finishing touch makes the hairline look very natural.
Related post: The Complete Guide To Edges Or Baby Hairs
Step 8: Final Check

Source: DionaLatia
Gently fluff or comb through the weave on top to achieve your desired volume. Make sure the leave-out lie smoothly over the tracks. Comb carefully, since the wefts are held by glue (you don't want them loosening).
Once finished, you'll have a full head of hair on the weave with no visible part line. You can easily flip or move the hair to either side or style it in a ponytail, since the tracks form a continuous base under the surface.
Related post: Last-minute Quick Weave Hairstyle Ideas
Benefits of Flip-Over Quick Weave
There are a lot of reasons people love this technique, and after trying it myself, I can see why it's become so popular. Here are a few standout benefits:
❤ Protects Your Natural Hair
Since most of your hair is braided and covered, this method helps protect your strands from heat, environmental damage, and over-manipulation.
❤ Preserves the Hairline
Unlike traditional sew-ins or glue-in frontals, there's minimal to no tension on your edges. You're not gluing anything directly onto your skin or hairline, which greatly reduces the risk of breakage.
❤ No Part Commitment
You're not locked into a side or middle part. With the flip-over method, you can adjust the front section of your hair however you like each day. It really gives me flexibility and freedom in styling.
❤ Blends with Any Texture
Whether your hair is relaxed, transitioning, or fully natural, this method works. You just need to match your leave-out to the texture of the bundles for a smooth finish.
❤ Quick and Affordable
The install time is much shorter than a full sew-in or lace frontal. You can often complete the entire style in under two hours. It's also budget-friendly since you're not paying for lace customization or plucking.
FAQs for Flip-Over Quick Weave
What Hair Texture Works Best for This Method?
This style suits most hair textures – from very straight to very curly. You will need some hair at the front to leave out and blend, usually at least a few inches. If your hair is very short, a flip-over style with minimal leave-out (or a full cap flip-over with no leave-out) can work instead. But generally, having even 3–4 inches to blend makes the final look most natural.
How Many Bundles Do You Need?
Typically, 3 bundles of hair are enough for a flip-over quick weave. These bundles are applied row by row to cover your head. If you want extra length or thickness, or if your head is large, you might use 4 bundles. In most cases, 3 bundles provide full coverage, and you can add a fourth if you desire more volume or longer length.
The following are the best-selling hair bundles of UNice. You can choose according to your needs.
How Long Does the Flip-Over Method Last?
With proper care, a flip-over quick weave can last several weeks. Most stylists suggest you can keep it in for about 4–8 weeks. It often holds well for up to 4-6 weeks before the glue bond loosens or your natural hair growth becomes obvious. After that point, it's best to remove or redo the weave to avoid tangling or buildup. Regularly refreshing any glue spray and keeping your scalp clean can help it last on the longer side of that range.
Are Quick Weaves Damaging to Your Hair?
Any style that uses glue or adhesive has the potential to cause dryness or damage if not done correctly. However, the flip-over method is generally kinder to your hair. Because a cap is used and you avoid tight braids, your hair experiences much less stress. To minimize any risk, use a protective barrier (like hair shield spray), oil, or moisturize your scalp before installing, and be very gentle when removing the adhesive.
Elevate Your Style with a Flip Over Method
The Flip-Over Quick Weave truly transforms how you approach protective styling. With its effortless versatility, natural appearance, and hair-preserving benefits, it's a win-win for anyone looking to elevate their look.
Thinking about trying this method? Go for it! And if you're unsure about attempting it yourself, a professional stylist can bring your vision to life while ensuring your hair stays healthy along the way. Your perfect, flip-ready style awaits. Are you ready to make the leap?


