

How to Do Beach Wave Hair: 5 Effortlessly Chic Methods
There’s something undeniably magical about beach waves—they scream carefree summer days, salty breezes, and that "I woke up like this" charm. Whether your hair is naturally straight, curly, or somewhere in between, we’ve rounded up 5 easy methods to help you master beachy waves at home. Let’s dive in!
Use a Curling Iron or Wand
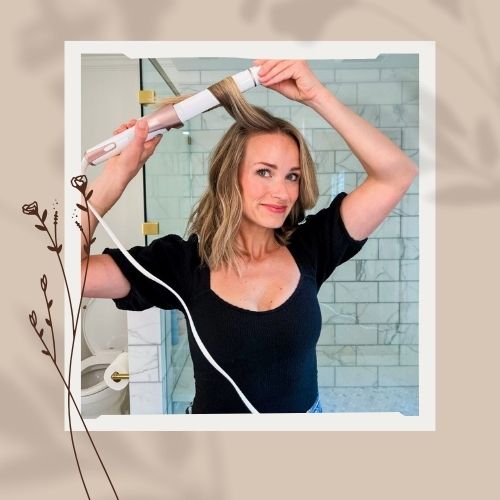
Source: Pinterest
A curling iron or wand is one of the most classic ways to achieve beach waves.
Best for: Short to collarbone-length hair, defined texture.
1️⃣ Use a 25–32mm curling wand preheated to 180°C (355°F).
2️⃣ Randomly wrap 2cm sections (skip the roots), alternating directions. Leave ends straight.
3️⃣ Once cooled, scrunch waves upward with volumizing spray on your palms.
✨ Key: Hold each section for ≤8 seconds to avoid tight "spring curls."
Braid-and-Air-Dry Method (No Heat)
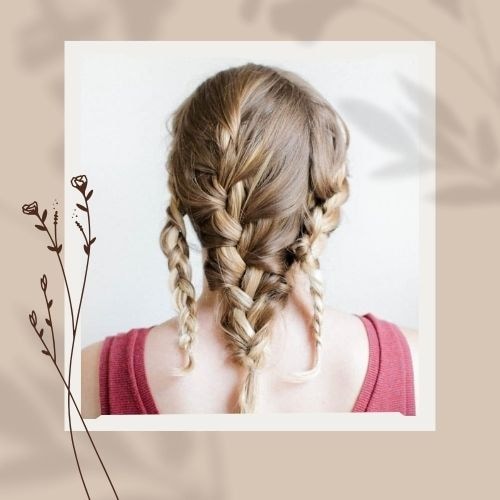
Source: Pinterest
No heat? No problem. Braiding your hair before bed can give you beautiful, soft waves by morning.
Best for: Naturally wavy/damaged hair, lovers of loose, effortless waves.
1️⃣ After washing, towel-dry hair and spritz with sea salt spray for texture.
2️⃣ Divide hair into 4–6 sections and braid loosely (French braids or fishtails work best; looser braids = bigger waves).
3️⃣ Air-dry overnight or blow-dry on low heat.
4️⃣ Unravel braids and gently finger-comb. Set with a dab of texturizing wax.
✨ Pro Tip: For coarse hair, mist lightly with water before braiding. For fine hair, create smaller braids for denser waves.
Use a Flat Iron
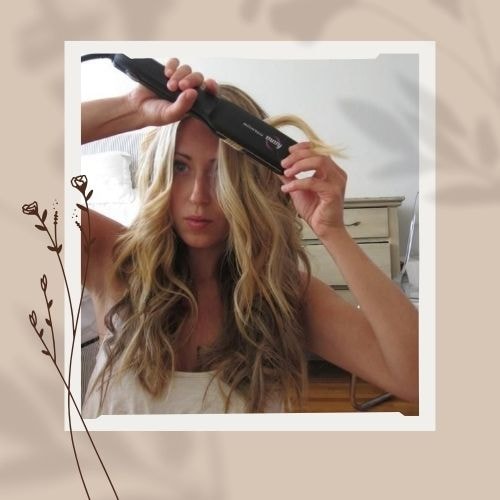
Source: Pinterest
Yes, your flat iron can do more than just straighten—it can actually help you create effortless beach waves.
Best for: Medium to long hair, quick polished waves.
1️⃣ Section hair and start from the bottom. Take a 2cm-wide strand.
2️⃣ Clap a flat iron near the roots, twist it 180° inward, and slowly glide down to the ends.
3️⃣ Alternate twist directions (inward for one section, outward for the next) to avoid uniformity.
4️⃣ Once done, gently backcomb roots with a wide-tooth comb for volume.
✨ Tool Tip: Use a ceramic-coated flat iron at ≤160°C (320°F) to minimize heat damage.
Scrunch with Sea Salt Spray
This is perhaps the easiest and fastest method to get that “I just left the beach” look.
Best for: Naturally tousled hair, wet-look beach waves.
1️⃣ After washing, towel-dry your hair and flip your head upside down. Blow-dry until 70% dry.
2️⃣ Layer sea salt spray onto sections, scrunching hair upward with a "praying hands" motion.
3️⃣ Attach a diffuser to your blow-dryer and dry on low heat while continuing to scrunch.
4️⃣ Finish with a cold shot to set waves, then smooth ends with hyaluronic serum.
✨ DIY Option(Sea Salt Spray Alternative): Mix 1 cup warm water + 1 tbsp sea salt + 1 tbsp coconut oil in a spray bottle. Shake well before use as a natural alternative.
Overnight Sock Curls
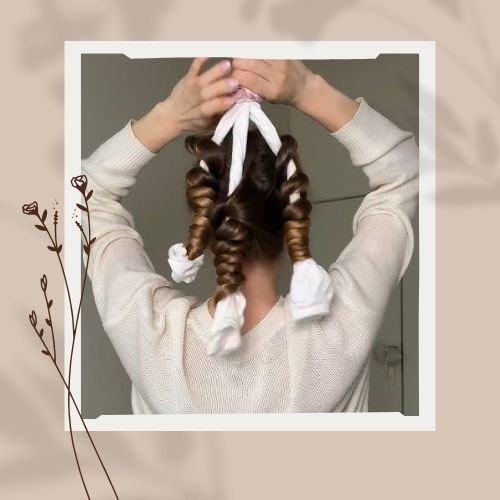
Source: Pinterest
This is a heatless, low-effort way to get soft, bouncy waves while you sleep.
Best for: Very long hair, heat-avoiders.
1️⃣ Cut the toe off a clean cotton sock and roll it into a doughnut shape.
2️⃣ Wrap slightly damp hair into 8–10 sections around the sock, securing with bobby pins.
3️⃣ Sleep on it! In the morning, unravel and smooth frizz with a drop of Moroccan oil.
✨ Bonus: Zero heat damage, ultra-soft waves ideal for thick hair.
Read More: How To Do Sock Curls?
Conclusion
Beach waves are about embracing texture and movement. Whether you prefer heat tools or overnight methods, there is a solution for every hair type and lifestyle. So go ahead and go wavy, crazy, and embrace those sunny beach feelings anytime you want to.
Submit Your comment