DIY Haircut: How to Give Yourself Face-Framing Layers
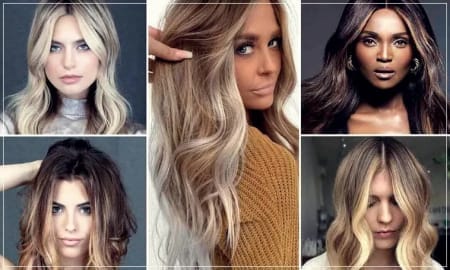
From celebrities to our friends who have face framing layered hairstyles, this look is everywhere. The face framing layered hairstyle has become one of the most popular hairstyles in 2024 and the trend will continue to be popular in 2025 as well. It has many other benefits, which I will explain in detail next.
Why should you choose a face framing layered hairstyle?
1. Suitable for all styles and hairstyles
Face framing layered hairstyles can easily match any hair texture and go with almost any hairstyle for all styles and haircuts.
2. Gives hair edges more movement
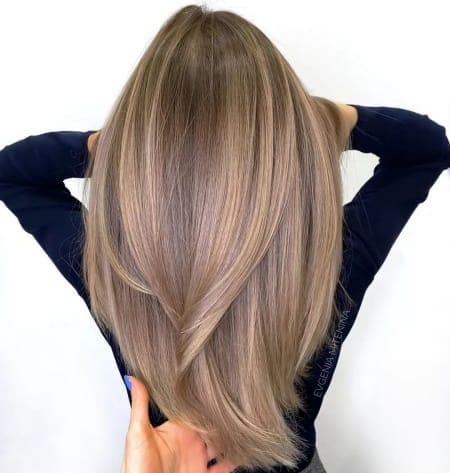
Face framing layers can breathe more life into your hairstyle. Whether your hair is short, medium or long, the Face framing layer will break up the length of your hair, making the ends lighter and giving your hair a younger look as you move through it.
3. Visually slim your face
Layers around the face remove excess volume from the sides of your face. Delicate face framing layers will make your face look thinner and more oval.
4. Give your look a new look
Everyone gets tired of their look after looking at it for a long time, and the same is true for even the prettiest girls. When you're ready to make a change, adding layers around your face is one of the cheapest ways to do so. New hairstyles, glamorous highlights, fabulous perms, chemical straighteners or a brand new haircut will all cost you more money
What is the difference between layers and face framing?
A question people often ask is there a difference between a face framing layer and a layer? Of course there is! Although they both have the word "layer" in them, there is a difference between a face framing layer and a layer. Below we will tell you the difference between the two.
What is a face framing layer?

Face framing layers are essentially the layers that make up the face. To cut these face framing layers, many stylists simply use a sliding cut technique, then select a starting point and slide down.
What are layers?
The layers of hair are intended to give the illusion of extra length to add volume. If layers are added to long hair, it will give the illusion of added length and movement. And short hair will give the illusion of added volume.
Whether the hair is long or short, you can add several layers to really lighten the hair and it will create a beautiful style for the hair.
Which one should you choose?
Which one should you choose? If it's just a subtle layered look and want someone to compliment their hair, then we suggest the Face framing layer. If you want a more textured cut, then we suggest cutting multiple layers. Or, you can totally do both!
How can I cut the face framing layers at home?
Nothing beats going to the salon with long, thick hair to get a light, sleek cut. Fortunately, you can cut face framing layers at home, and the results will astound you if you follow the right steps.
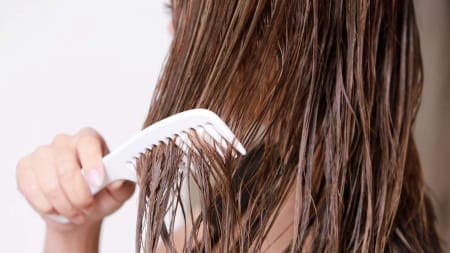
How do I get my hair ready for a haircut?
Before cutting your hair, gently wash it with a deep cleansing shampoo, then condition it to refresh and rejuvenate your scalp for a long-lasting shine. Then, to protect your hair from the heat, apply heat protection oil. Then, blow dry and comb your hair gently. After that, you can begin shaping the layers.
The face framing layer can be used to draw attention to face features, add volume to thinning hair, and shape curly, unruly hair. If you've been thinking about getting a haircut with face framing layers, you should definitely give this one a shot.
To avoid sharp edges or eighties-style haircuts, you'll need to be extra careful, gentle, and patient when cutting your own face framing layers at home.
Where do I begin with face framing layers?
Even if you want to add texture and definition to your hair, start your layers close to the chin, or below the nose for medium length hair. Shorter layers are required for the bob, but this is best left to the professionals.
How do I cut the layers of my face framing at home?
If you decide to cut your own face framing layers at home, the most important thing to remember is to trim your hair slowly and gently.
While short hair is more difficult to cut, long hair is the most difficult to layer and shape. The method below focuses on cutting face-length layers for long hair, but it also works well for short to medium hair.
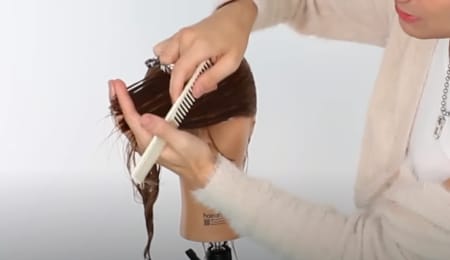
Step1. Begin by shaping your bangs.

Begin by creating a light triangle of hair on either side of the hairline at the front of the head. Begin at the chin and blend into the sides. Combine the two separated sections and comb forward, making sure to comb from the roots to the tips. The goal is to create a soft concave shape while not removing too much.
Place the comb in the center of your hair and rotate it to form the concave shape. Begin by chipping the hair rather than cutting it. Twist and release when you're finished. You'll notice that a concave shape has been formed. Check that both sides are the same length.
Step2. Continue to cut in sections.

Continue cutting the hair in the same manner from here, but without cutting too much at the ends.
Remove a 1 cm wide section of hair parallel to the first section. Clip the remaining hair back and repeat on the other side.
Remember to cut the ends rather than the sides. Hold the hair gently with your fingers and trim the ends short. Make sure you don't take off too much at this stage and that you go slowly and gently.
Step3. Make a sliding cut.
For the third part, take a width of about 1 cm and repeat the process on the opposite side of the hairline. We'd like to try a new hairstyle called a sliding cut from now on. Continue to cut slowly so that you have complete control over each hair.
To make a sliding cut, move the scissors down slowly as you cut a 1 cm length of hair. Examine both sides for evenness. Repeat with the remaining 1 cm of hair until you reach the back of your head.
Step4. Styling and final trimming

Comb through and check the scale after finishing the face framing layer cut. You should end up with an oval or triangular cut, with no hair heavier or longer on one side than the other.
Finish with a soft finish by combing through the roots and cutting them off. Then comb through again to ensure there is no excess residue.